Christine Cox

Archive for the ‘Uncategorized’ Category

Metalsmith: Breaking the Rules

As a silversmithing instructor, I spend a lot of time explaining to students how to get the perfect solder join. “Clean the metal. Use flux. The join must be perfect. Solder must touch both sides of seam. Both sides of seam must reach soldering temperature at the same time. Capillary action. Supports are heat sinks. Solder follows heat. Blah, blah, blah!”

On the other hand, I can’t tell you how many times I’ve grabbed a scrap piece of metal to do a quick demo for a student, explaining all the while that my solder might not flow because the metal isn’t clean or the joint isn’t aligned or whatever, only to have the little dear solder perfectly.

The rules are there to help us achieve success, to set up the most likely scenario for the solder to flow. The rules keep the frustration levels down and the success rate high, but that doesn’t mean they can’t be broken.

Recently, I ran into a dilemma and I have to be honest, this is one of those “cheats” that I didn’t expect to work, but work it did, and it was a life-saver.

I had a large, springy flower shape made from fine silver bezel wire. It took quite a while to form to the exact shape of the enamel it was meant to cradle. T-pins held the shape together, but I needed them to be perfectly aligned and the bezel wire was just too light and springy. A smaller shape made from thicker wire would have had the tension necessary to hold the 2 ends together for soldering, but this didn’t. What to do?

I reached into my drawer of doo dads (a technical term), pulled out a 2″ x 4″ x 1/8″ piece of scrap steel and slapped that puppy down onto my flower shape. Voila! Instant tension.

But, what about the “large supports are a heat sink” rule? What about the “you must bring the whole piece up to temperature at the same time” rule?

As you can see from my setup in the accompanying photo, I placed the steel back from the soldering point and it created no problem at all. Since the wire was so light and thin (28 gauge), I didn’t need to heat the whole thing. I was able to just heat the portion visible in the photo.

I still follow the rules for the best success at soldering, but it’s liberating to know that sometimes success lies in breaking them.

Sponsored by:

Volcano Arts

www.volcanoarts.com

Alice Comes To Life in Books

exploringalice

In August, bookbinder Fran Kovac taught a class at the Morgan Art of Papermaking Conservatory & Educational Foundation in Cleveland, OH (www.morganconservatory.org).

The class focused on various decorative techniques, such as framing, attachments and foundation molding, and worked with leather, paper and book cloth, as well as various charms and illustrations suitable for Alice in Wonderland.   The text blocks were made using books-in-sheets from Volcano Arts. The students added illustrations throughout the text before sewing, and the books were sewn with the French Link stitch on parchment straps.

Each student took home their own bound and decorated copy of Alice in Wonderland.”

The students were Edith Briskin, Michele Cotner, Margo Libman, and Amy Fishbach.

Beautiful work, ladies! Thank you, Fran!

Post by Fran Kovac and Christine Cox
Sponsored by Volcano Arts

rainbowmasthead-sm


5th Century: Oldest Surviving Biblical Manuscript

Books, Miniatures, Writing and Supports
(Timeline Project)

5th c – Oldest surviving biblical manuscript; first editions of Christian Bible Quedlinburg Italia – Fragments of 6 folios from a large illuminated manuscript of an Old Latin translation of the Christian Bible (probably produced in Rome in 420s or 430s).  Pieces were reused in bindings of other books bound in 1618 in Quedlinburg, Germany. Uncial script.

quedlinburgitalafolio2rillus1kingschap15

This post is part of an ongoing series on books, miniatures, writing and supports since the year 1. Please consider it a kick-start for your own private timeline and a springboard for further research. See my blog for the rest of the series.

2016vaexclamation300

Bookbinding, Metalsmithing and Glass
We have the tools and supplies you need for your projects and classes
www.volcanoarts.com

Gothic Script

Gothic, I will tell you candidly
I loathe you paleographically
Your thick strokes and nonexistent thins
Offspring of the Carolingians

Into the seventeenth century
The scribes wielded you like weaponry
You’re as measured as a picket fence
And your letterforms are just too dense
–Christine Cox

To show that Gothic script could be fatiguing to read, medieval scribes invented this joke sentence:

mimi numinum niuium minimi munium nimium uini muniminum imminui uiui minimum uolunt

“The snow gods’ smallest mimes do not wish in any way in their lives for the great duty of the defenses of wine to be diminished.”

Metalsmith: Polishing Inside a Tube

polishinsidetube

Metalsmith: Polishing Inside a Tube
(A typically occasional series by Christine Cox)

Need to polish inside a tube? Use a piece of rouged jute and a small vice. Run the tube back and forth a few times and you’re done.

How To Drill Glass

Bottles and Windows Quake in My Presencefransspine,
Or How to Drill Glass

By Christine Cox

How you drill the glass and the type of bit you use depends on the size of the hole and which type of tool you own. When firing glass in a kiln, the glass gets hot enough to actually flow just a little. This means using a larger drill bit than the finished hole size required. You can use either a diamond core drill bit on a drill press or you can use a special blunt-tipped diamond bit made to work in a Dremel or other rotary tool. I had used both in the past but wanted to study the benefits of each option.

bothdrillbits

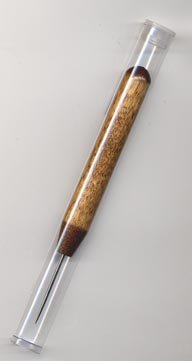
(L) Bit for hand-held rotary tool
(R) Core bit for drill press

After drilling more holes than I want to count, I like the diamond core drill bit on a drill press. It’s a faster and more precise operation than using a Dremel. On the other hand, the rotary tool bit works almost as well and requires only a tool that most of us have around anyway.

Some tips about drilling glass:

Use a Sharpie permanent pen to mark where you want to drill.

It’s important to keep the bit wet and clean during the entire drilling process. It keeps the bit cool, keeps glass dust from going up your nose and it adds a little “slip” to the process. Never drill dry glass. Simply keep water on the piece of glass and occasionally lift the bit out of the hole to allow the glass dust to move out into the water and the water to move into the hole. If a paste starts to form while you are drilling, stop and add water.

When I’m using a Dremel, I keep a little water nearby and use my fingers to splash it onto the top of my glass as I drill. When I’m using a drill press, I like to set the piece of glass I’m drilling onto a rubber mat, then place that into a large flat dish of water on my drill press table. In other words, the glass is actually sitting in a shallow pool of water while I drill.

In both cases (rotary tool or drill press) you want to use a slow speed and a steady hand.

carolelamb-glassbook

Carole Lamb

Always seat the bit all the way into the chuck. It cuts down on vibration and is safer. Also, it’s better to drill half way through the glass from one side, flip the glass over and then to continue drilling from the other side. This helps prevent chipping the surface of the glass.

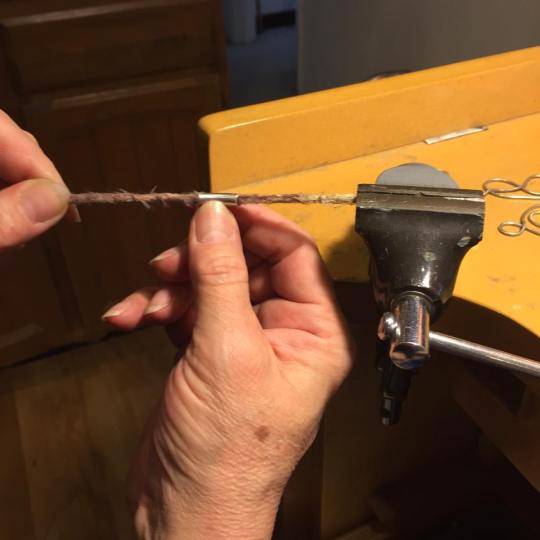
The bit for a rotary tool is shaped sort of like an hourglass. Put some water on the glass and start the tool’s motor (slow speed). Hold the tool at about a 15-degree angle and just tap the glass with the edge of the bit to give yourself a little starter dent. Now lift the tool, settle in, get comfortable and brace your arms. Start drilling the hole by moving the tool, at a 15-degree angle, in a slow circular motion. Continue with the same motion and angle until you are about half way through the glass.

Turn the glass over and start again from the other side. I suggest that you dry the glass and mark it again. The parallax caused by the water and also by the beveled glass will visually distort the hole’s placement. The goal is to have the 2 halves of the hole meet in the middle. When you first break through, the hole will be a little misshapen. If you look at the bit you’ll see that its “shoulder” is also encrusted in diamonds. Very gently, with no pressure at all, run the bit all the way through the glass so that the shoulder of the bit can clean out the hole and make it into a neat and tidy round shape.

sallydoxieTo use a diamond core bit in a drill press, the process is similar. Place a shallow dish of water on the drill press stand. Set something into the dish to set the glass on. This should be something that isn’t slippery and that you don’t mind damaging.

Again, seat the bit well into the drill’s chuck. Use a slow speed and a firm hand while drilling. Do not push the drill bit through the glass. Let the bit grind the glass away. The diamond core bit will leave a little cylinder of glass after its work is done. Be sure to remove this from the dish or you may scratch the bevel while drilling subsequent holes. Again, parallax will cause alignment problems so take your time when exiting and re-entering the holes.

dremel-angle

Using a Dremel, you rotate the bit at a 15% angle. It’s easier than it sounds.

dremel-closeup

Water is a lubricant and keeps you from breathing ground glass


drillpress-drilling

My set up for drilling with a drill press

drillpress-drilling1

Mark holes with a permanent pen and then be sure to allow for parallax when lining up the bit and the marks

bloodwood6in_small
Christine Cox teaches bookbinding and metalsmithing classes (group and private) at her studio in Volcano, CA (halfway between Sacramento and Lake Tahoe)

This article originally appeared in ARTitude Zine and is reprinted with permission. ARTitude is no longer published, which is a great loss for the art world.

Amazing Awls

Besides being one of the first tools created by humans, the awl is amazing for its usefulness. The earliest were made from wood, stone, obsidian and bone. Before that they were probably used as found in nature, in the form of talons or teeth.

Grotte de Tarté

A few uses:

  • Punch holes in the pages before sewing a book
  • Check the depth of etching on a piece of metal
  • Push eyelets into tight holes
  • Dig small items out of tight spaces
  • Precisely scratch off resists
  • Sgraffito in enamels
  • Untie knots in threads
  • Push “reset” buttons on small electronics
  • Clean out a seam before soldering
  • Scratch words and designs into polymer clay and PMC
  • Point during demonstrations
  • Poke holes in leather
  • Hold jump rings in place while making chain maille

Sooner or later the question becomes “why don’t you own one.” You’ll need one for every room!

lda-tube
Get yours from Volcano Arts

Historic photo of awls by: Didier Descouens – Own work, CC BY-SA 3.0, https://commons.wikimedia.org/w/index.php?curid=10880610

5th Century: Laced Boards

Books, Miniatures, Writing and Supports
(Timeline Project)


Western books from the fifth century onward were bound with pages made from parchment folded and sewn onto strong cords or ligament that were then laced to wooden boards and covered with leather.

Wooden boards – Oak was common in England and France, pine or beech was used in Italy (Italian books feel lighter)

This post is part of an ongoing series on books, miniatures, writing and supports since the year 1. Please consider it a kick-start for your own private timeline and a springboard for further research. See my blog for the rest of the series.

4th Century: First Signed Illuminations

Books, Miniatures, Writing and Supports
(Timeline Project)

Year 354—First illumination work with known artist name: Roman calendar now called Chronography of 354 — Furius Dionysius Filocalus wrote the titles.

This post is part of an ongoing series on books, miniatures, writing and supports since the year 1. Please consider it a kick-start for your own private timeline and a springboard for further research. See my blog for the rest of the series.


4th Century: Latin Vulgate Translation

Books, Miniatures, Writing and Supports
(Timeline Project)


Malmesbury Bible

382 to 404 – Latin Vulgate Christian Bible translation (from Greek to Latin) commissioned by Pope Damasus I (both testaments). Translated and written by Eusebius Sophronius Hieronymus (St. Jerome). Written in Uncial script. (This version was used for over 1,000 years and was the Bible of the Dark Ages)

There’s an excellent article on the Latin Vulgate in Wikipedia

This post is part of an ongoing series on books, miniatures, writing and supports since the year 1. Please consider it a kick-start for your own private timeline and a springboard for further research. See my blog for the rest of the series.

(photo by Adrian Pingstone) Licensed under Public Domain via Commons – https://commons.wikimedia.org/wiki/File:Bible.malmesbury.arp.jpg#/media/File:Bible.malmesbury.arp.jpg

Tag Cloud