Christine Cox

Posts tagged ‘enamels’

Metalsmith: Cushion Behind a Stone

There are times when a jeweler needs a cushion behind a stone or enamel that’s being bezel-set, whether to raise it higher, or to even out an unevenness such as in the case of a warped enamel. One solution is to use fine sawdust between the piece and the bezel. Some people like to use an old credit card. On a larger piece, like the enamel in the accompanying photos, I like to use a piece of a plastic lid, as from a can of coffee or something similar. They come in different thicknesses, and this little safety measure gives me a lot of peace of mind when working with a bezel roller later.

Update: I’ve had a few people write to me about using plastic for this step (some for, some against). I use plastic because it is a long-lived, neutral substance. It doesn’t rot away making the stone loose, or swell when it’s wet, potentially breaking the stone. Sawdust and cork are fine, but beware of the pitfalls.

Sponsored by:

Bookbinding, Metalsmithing and Glass
We have the tools and supplies you need for your projects and classes
www.volcanoarts.com
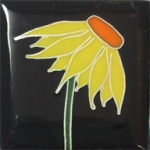
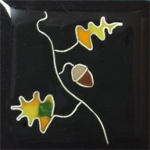
California Native Plants in Cloisonné

California Native Plants in Cloisonné
By Christine Cox

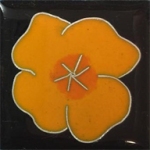
Recently, I finished these 4 kiln-fired cloisonné pieces, which are a little over an inch square each. They are made from sterling silver, fine silver and enamels, which are glass ground with different minerals for color. Each was fired repeatedly in a kiln at almost 1500°. It’s an exacting and exciting process with beautiful results.

The oldest cloisonné enamels — where extremely thin wires are used to make the shapes — are from the Middle East in the 2nd century BCE. From there the technique spread to the Byzantine Empire and to Russia. Spreading along the Silk Road, it found its way to China, Japan and beyond.

My pieces are destined to become bezel-set corners on a leather-covered wooden book which will house the letters of a California miner. He mined in and around our area of the California foothills and sent letters home for 3 years. The cloisonné pieces are in celebration of California’s beautiful native plants.

Check out the Wikipedia entry on Cloisonné to learn more.

Bookbinding, Metalsmithing and Glass
We have the tools and supplies you need for your projects and classes
www.volcanoarts.com
Cross Pollination: Metalsmithing and Enameling

Image

Being both a metalsmith and an enamelist means that I’m constantly using tools made for one medium while playing in the other. I’ve made some fascinating discoveries that have made both jobs easier.

  • Better detail in Keum-boo (photo above)
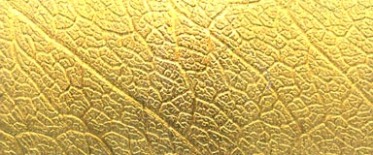
    Keum-boo is the Korean art of fusing gold leaf to depleted sterling silver. The complicated technique involves heat and burnishing. Dissatisfaction with the level of detail I was able to obtain with traditional burnishing tools led me to a fiberglass brush used in enamel work. (Available from Thompson Enamel). Since the fiberglass can take the heat, it’s the perfect tool to pounce the leaf down into the smallest textural details while the metal is still on the hotplate. The photo above shows a piece of keum-boo over a texture made by passing the sterling silver through a rolling mill with a skeleton leaf. Just look at that awesome detail!
  • Glue that can take the heat
    If you are soldering something and you have difficulty getting the solder to stay where you put it, try this trick. Get some Klyr-Fire from your favorite enamel supplier. It’s a low-tack adhesive liquid which is made to take the heat of a kiln for just a little while.
    Using tweezers, dip each piece of solder into the adhesive before setting it into place on your piece. While soldering, the Klyr-Fire will last just long enough to keep the solder in place while you bring everything up to temperature. This is great for beginners who might burn their fingers while trying to heat flux to the glossy point and then add solder, or for those who tend to upset the soldering set-up while placing balls or chips of solder on a precarious surface. If you’ve been using hide glue for this type of thing, you’ll appreciate the lack of odor in the Klyr-Fire. (And in case you were going to ask, it won’t work for granulation)
  • Saturated pickle
    Sometimes a metalsmith needs pickle that’s really saturated to electroplate the silver line left on copper after soldering with silver solder. Save the pickle from enameling on copper. I keep a truly nasty pot of saturated pickle around for use in both enameling (to remove oxides) and for electroplating.
  • Polishing papers
    After years of experimenting, I have yet to find anything better than our 400 grit polishing papers for cleaning metal prior to enameling. Simply sand the metal under running water and with a few strokes the water will sheet off and not bead up. Perfect!
Triangle kiln support

Triangle kiln support

  • Triangle kiln supports
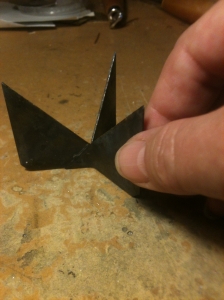
    You know how it is; every soldering operation is a new adventure in supports, clips, third-hands and binding wire. I’ve found that for flat items, which need to be heated from below as well as above, there’s often nothing better than a triangle kiln support (also available from Thompson Enamel). They’re made of steel, so they can take the heat, and they stay out of the way while you move the torch. They’re small and therefore not a giant heat-sink, as a soldering tripod would be. They’re far more stable than a nest or coil of metal. Use them right-side-up or upside-down for the best support option for the job.

    • The triangle kiln supports are listed in the Thompson catalog as “three point trivets” and are numbers TPT-1 through TPT-5
  • Old soldering tripod use
    If you have an old soldering tripod, use the steel mesh that came with it for transporting enameled items in and out of the kiln. Just bend the corners down so that you can get a kiln fork underneath. A piece of mica on top of the mesh will stabilize the piece during the trip to the kiln.
  • Silver Dust in the Sky
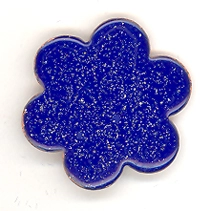
    If you work in either sterling or fine silver, save your silver dust when you are sawing. When you are enameling, use a sifter to clean out the silver dust and then sift a tiny bit of the silver onto your last fired layer of enamel. Fire it one more time and remove it from the kiln when the silver and glass have just fused together (think: fire polish). A quick polish and the silver will look like stars. This looks especially gorgeous on a dark enamel. You can also use the silver dust under transparent enamel (as you would silver leaf), but spend more time cleaning the silver ahead of time. You don’t want to pollute your enamel.

    Silver dust on a blue enameled copper flower

Treasure: Books of Gold Leaf

Just got an email asking for ideas on what to do with several books of 23k gold leaf. Depending on the thickness of the gold, here are some ideas:

  • Gilding on a lot of surfaces (put down glue, wait for it to get tacky, put leaf on, dry, brush off spare leaf)
  • Keum-boo (heat fine or depleted sterling silver to 600 degrees or so and then burnish gold leaf to it)
  • Tooling book covers (blind tool line with hot tool, paint with glare – glorified egg whites, apply gold leaf, dry and brush off spare leaf)
  • Applying under transparent enamels
  • You could always melt it down in a crucible with borax and then roll out the ingot to make your own gold sheet.

The original email mentioned working with silver sheet, so I’m thinking keum-boo is the answer to her question. Celie Fago did an excellent book on it. Here’s a link to it on Amazon:
Keum-boo on Silver Techniques for Applying 24k Gold To Silver, By Celie Fago

Tag Cloud