Christine Cox

Bookbinding: Cleaning a Dried Out Glue Brush
(Previously published in The Muse zine)

I’ve heard it so many times, “I forgot to clean my brush after using PVA (synthetic adhesive). Now I have to throw the brush out.” No you don’t!

  • The first thing to try when your brush is stiff from glue is to simply soak the brush in a dish of cold water (hot water may expand the metal ferrule on your brush, causing the bristles to fall out — a great tip for painters too). Soak it for an hour or two (or overnight if you have a lot of adhesive to contend with). This will reactivate the PVA so that you can clean the brush normally. Once the adhesive is out, use a brush cleaner (a cake of brush-friendly soap in a deep jar) to get rid of any globs hiding in the bristles.
  • If soaking the brush in water doesn’t do the job and the bristles are still stiff, try this excellent technique.
    Put a little white vinegar (maybe a teaspoon or so) in a glass and then fill it to the bottom of the brush’s ferrule with hot water (I know, I know, I just told you not to use hot water, but we’re desperate here). Hot tap water is fine. Put the brush in and let it soak for about 30 seconds. It will come out soft and supple.
    Now you have a brush with vinegar (3% – 6% acetic acid) in it. Any binder worth her salt knows that one of the most important things about bookbinding for posterity is to keep the pH as neutral as possible. To neutralize the acid in your brush (raise the pH), dump the water/vinegar out of the glass, rinse the glass and refill it with cold water. This time add just a little baking soda (a base). Use the glue brush to stir the neutralizing solution for about 30 seconds, pressing the bristles against the side of the glass to open them up and let the baking soda into the interior bristles. Rinse the brush thoroughly, again opening it up and rinsing the inside. Your brush should be ready to go back to work.

Sponsored by:

Volcano Arts

www.volcanoarts.com

Books, Miniatures, Writing and Supports (Timeline Project)

Early 6th Century – The Biblioteca Capitolare is one of the world’s oldest libraries, established as a writing workshop for the cathedral. Probably the oldest European library still in existence. (Verona, Italy)

This post is part of an ongoing series on books, miniatures, writing and supports since the year 1. Please consider it a kick-start for your own private timeline and a springboard for further research. See my blog for the rest of the series.

Sponsored by:

Volcano Arts

www.volcanoarts.com

Torch Comfort

Most metalsmiths set up their torch like thisI set mine up like this

Most metalsmiths hold their torches differently than I do.

Others set up their torch head so that the tip is opposite the control knob. Check out the first photo accompanying this post. Setting up the torch tip this way means that adjusting the flame requires a deft little move involving the joints of your thumb and your index finger. It takes a little getting used to, especially since you’re using your non-dominant hand (or at least you “should” be).

I like to set up the torch so that the control knob and the tip are on the same side of the torch head (see photo). This way I can adjust the control knob with the tips of my index and thumb, and it feels quite natural.

The beauty of working in your own studio is that it’s up to you. Try my way. You may find it more comfortable.

Sponsored by:

Volcano Arts

www.volcanoarts.com

As a silversmithing instructor, I spend a lot of time explaining to students how to get the perfect solder join. “Clean the metal. Use flux. The join must be perfect. Solder must touch both sides of seam. Both sides of seam must reach soldering temperature at the same time. Capillary action. Supports are heat sinks. Solder follows heat. Blah, blah, blah!”

On the other hand, I can’t tell you how many times I’ve grabbed a scrap piece of metal to do a quick demo for a student, explaining all the while that my solder might not flow because the metal isn’t clean or the joint isn’t aligned or whatever, only to have the little dear solder perfectly.

The rules are there to help us achieve success, to set up the most likely scenario for the solder to flow. The rules keep the frustration levels down and the success rate high, but that doesn’t mean they can’t be broken.

Recently, I ran into a dilemma and I have to be honest, this is one of those “cheats” that I didn’t expect to work, but work it did, and it was a life-saver.

I had a large, springy flower shape made from fine silver bezel wire. It took quite a while to form to the exact shape of the enamel it was meant to cradle. T-pins held the shape together, but I needed them to be perfectly aligned and the bezel wire was just too light and springy. A smaller shape made from thicker wire would have had the tension necessary to hold the 2 ends together for soldering, but this didn’t. What to do?

I reached into my drawer of doo dads (a technical term), pulled out a 2″ x 4″ x 1/8″ piece of scrap steel and slapped that puppy down onto my flower shape. Voila! Instant tension.

But, what about the “large supports are a heat sink” rule? What about the “you must bring the whole piece up to temperature at the same time” rule?

As you can see from my setup in the accompanying photo, I placed the steel back from the soldering point and it created no problem at all. Since the wire was so light and thin (28 gauge), I didn’t need to heat the whole thing. I was able to just heat the portion visible in the photo.

I still follow the rules for the best success at soldering, but it’s liberating to know that sometimes success lies in breaking them.

Sponsored by:

Volcano Arts

www.volcanoarts.com

A typically occasional series by Christine Cox

I’m sure that if I had been a seamstress I’d save meaningful bits of fabric, or if I had been an engineer I’d collect antique slide rules or something similar. The fact is that I’m a metalsmith and a bookbinder. I collect antique tools made for those trades.

They’ve come to me in various ways; purchased in antique stores, given to me by a doting grandfather, found on garage sale tables. What they all have in common is that they are functional and that they wear the patina of time.

What to watch out for:

Avoid rust, or be prepared to clean it off (a nasty job that can yield great rewards)

Check that nothing is loose.

Wooden handles don’t last well. If the wood is dry and cracked, walk on by. The tool won’t be safe to use.

Because they are antiques, they often aren’t up to their original jobs, but metalsmiths are nothing if not flexible. I was once the honored recipient of an ice pick that had rusted, but the pick’s pedigree made it a worthy acquisition. I cleaned off the rust, but the underlying metal was pitted. It wasn’t up to picking or poking anymore, but perfect for stirring, and that’s its new life. I think the original owner would be pleased that it’s still being used.

I’m sure the file pictured with this article was sharp and robust at some time in the past, but now it’s teeth are worn. I use it as my “fine” file and smile every time I do. The beautiful file is now reserved for only the lightest finishing strokes on a piece and it’s exactly the right tool.

Keep your eyes open. They’re out there!

Sponsored by:

Volcano Arts

www.volcanoarts.com

There are times when a jeweler needs a cushion behind a stone or enamel that’s being bezel-set, whether to raise it higher, or to even out an unevenness such as in the case of a warped enamel. One solution is to use fine sawdust between the piece and the bezel. Some people like to use an old credit card. On a larger piece, like the enamel in the accompanying photos, I like to use a piece of a plastic lid, as from a can of coffee or something similar. They come in different thicknesses, and this little safety measure gives me a lot of peace of mind when working with a bezel roller later.

Update: I’ve had a few people write to me about using plastic for this step (some for, some against). I use plastic because it is a long-lived, neutral substance. It doesn’t rot away making the stone loose, or swell when it’s wet, potentially breaking the stone. Sawdust and cork are fine, but beware of the pitfalls.

Sponsored by:

Bookbinding, Metalsmithing and Glass
We have the tools and supplies you need for your projects and classes
www.volcanoarts.com

6th Century: Garima Gospels

Books, Miniatures, Writing and Supports
(Timeline Project)Garima-gospel

~530 – Garima Gospels include some of the earliest Christian book paintings (Aksum, Ethiopia)

This post is part of an ongoing series on books, miniatures, writing and supports since the year 1. Please consider it a kick-start for your own private timeline and a springboard for further research. See my blog for the rest of the series.

Sponsored by:

Volcano Arts

Bookbinding, Metalsmithing and Glass
We have the tools and supplies you need for your projects and classes

Books, Miniatures, Writing and Supports (Timeline Project)charter

550 to 1066 – Fewer than 2,000 charters and writs survive from the Anglo-Saxon period (England)

This post is part of an ongoing series on books, miniatures, writing and supports since the year 1. Please consider it a kick-start for your own private timeline and a springboard for further research. See my blog for the rest of the series.

Sponsored by:

Bookbinding, Metalsmithing and Glass
We have the tools and supplies you need for your projects and classes
www.volcanoarts.com

Metalsmith: Mini Anvil

Metalsmith
(A typically occasional series by Christine Cox)

Need to hallmark or center-punch your piece of metal? It’s such a simple job when your piece is flat. Just lay the metal down on a flat, hard surface and whack away.

But what if the piece isn’t flat?

As long as there’s enough room underneath the piece to set it on an anvil, you can stamp or center-punch at will. Here’s the secret, anything can be an anvil, as long as it’s up to the job. I have a corner in my bench drawer devoted to small “thingys” made of steel in every shape.

One of my favorites is the little steel dot made for setting rivets I got somewhere, but I also have knife handles, hammer heads, ball bearings and more.

Sponsored by:

Bookbinding, Metalsmithing and Glass
We have the tools and supplies you need for your projects and classes
www.volcanoarts.com

By Christine Cox

Spinner rings – Fidget rings – Worry rings – Meditation rings

It’s a beautiful design, a ring bound by another ring, which spins freely. They’re great for people who like something to fiddle with, and, it’s a fantastic design element.

Whatever you call them, when one breaks, it can be a challenge for a jeweler to fix, especially if what fails is the solder on the inner ring.

Thus was a repair job that was brought to me a few months ago. The solder on the inner ring had broken, but not the solder on the outer ring. The problem was that there was no way to get the outer ring off so that I could solder the inner ring.

Let’s back up a little. The way one of these rings is made is by shaping and soldering the 2 rings separately and then sliding one onto the other. The inner ring is then flared open (or separate rim pieces soldered on) so that the outer ring can’t slide off again. Unfortunately for the jeweler who has to make the repair, the flared edges of the inner ring cannot be un-flared to allow the outer ring to slip off again. The ring has to be repaired as a whole.

Binding wire to the rescuebraidedring

For this repair I needed to clean up the old solder joint, reshape the inner ring into a fully closed circle, and then hold it closed as I soldered, all without accidentally soldering the outer ring to the inner ring and causing it to stop spinning.

If you look at the process photo carefully, you’ll see that there are 3 pieces of binding wire on the ring. Two are around the perimeter of the inner ring, holding it closed.  I put one wire at the top and one at the bottom of the ring to hold the solder joint together along its entire length (the ring was a heavy gauge and wanted to spring open). There was no room for manipulating the metal to get the tension needed for it to hold itself closed (a trick that every ring maker learns early), so the binding wire would have to do that job.

spinnerring_sm
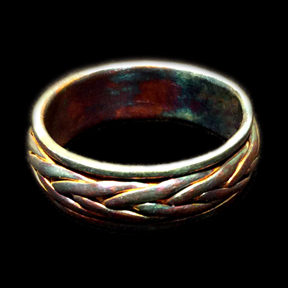
The third piece of wire was used to hold the outer ring up and away from the inner ring so that they wouldn’t be soldered together. I fed the wire between the 2 rings and then oozled it around to a position near the seam, but not close enough to accidentally solder the wire to the ring. The thickness of the wire was now giving me the distance I needed between the 2 rings and I was ready to solder as normal.

Everything went swimmingly, my client was pleased, and the ring spins like new.

Sponsored by:

Bookbinding, Metalsmithing and Glass
We have the tools and supplies you need for your projects and classes
www.volcanoarts.com

Tag Cloud